Make-Up Artist: Nastassia.Michailovna
1. Step - Foundation
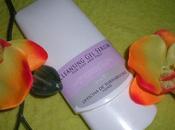
- I used a Base ( NUDE MAGIQUE BB Cream by L'OREAL )
- I used one shade lighter than I normally use for her because light skin was very fashionable at this time (EVA GARDEN - Highlight Foundation 250)
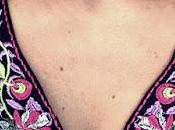
- I mixed the CREAMY CONCEALER 606 (EVA GARDEN) with the foundation to cover her eye circles and light this part up
- To cover some spots you can use Cover Cream (HORST KIRCHBERGER)
- It's not at this picture but use a Powder to keep the face mat
- Use brushes, no sponges, they take too much from the Make-Up
1. PASSO: BASE
- Ho iniziato il make-up, applicando una semplice base (NUDO MAGIQUE BB Cream di L'OREAL)
- Ho usato una tonalità più chiara rispetto a quella che uso normalmente perché la pelle chiara era molto di moda in quel periodo (EVA GARDEN - Highlight Foundation 250)
- Ho mescolato il correttore CREMOSO 606 (EVA GARDEN) con il fondotinta per coprire le occhiaie e illuminare questa parte.
- Per coprire alcuni punti si può usare la crema Coprente (HORST Kirchberger)
- Utilizzate i pennelli e non le spugne, rendono meglio.


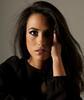
2. Step: Eyebrows and winged eyeliner + Lips
- to create those arched and defined eyebrows I used EYEBROW PENCIL 90 (EVA GARDEN). This pencil is amazing, it fits with every skin and haircolor.
- to get these winged eyeliner you have to line the top lash line and after that follow the natural curve of you bottom lash line. With this technique it is very easy. Thicker wings tend to depict more of a ''Rockabilly'' 50's style. I used Infallible® Lacquer Liner 24H (L'ORÉAL)
- I used a lip pencil from EVA GARDEN (Lippencil 15N) to create these perfectly defined Lips
- To get these typical mat lips I used Velvet Mat - Satin Lipstick/ 608 Apple Red (KIKO) and applied it with a lip brush
2. Passo: sopracciglia e eyeliner alato + Lips
- per creare delle sopracciglia arcuate e definite ho usato Eyebrow Pencil 90 (EVA GARDEN). Questa matita è incredibile, si adatta ad ogni tipo di pelle e colore di capelli.
- per quanto riguarda l' eyeliner, dovete tracciare una linea che parta dall'inizio dell'occhio e segua la sua linea naturale. Aprendo gli occhi, dovete creare una specie di V, che dovrebbe in linea di massima all'inearsi con la fine delle vostre sopracciglia. Con questa tecnica sarà più facile. Ali più spessi tendono a rappresentare più di uno stile Rockabilly '50. Ho usato Infallibile ® Liner 24H Lacca (L'ORÉAL)
- Per le labbra ho usato una matita labbra della EVA GARDEN (Lippencil 15N) per creare questo effetto perfettamente definito
- Per ottenere un risultato mat che ho usato Velvet Mat - Satin Lipstick / 608 Apple Red (KIKO) e applicato con un pennello labbra. Il colore è molto intenso. Ve lo consiglio!!!


3. Step - Mascara and Blush
- I used mascara only at the top lash line to put an accent on the eyeliner
- You have to find a blush which fits with your skintone and the tone of the lipstick.
- I used a little bit of blush, just to notice enough of a rosie glow.
- TIP: blue based lipstick will make whiter your teeth
3. Step - Mascara e Blush
- Ho applicato il mascara solo alla punta delle ciglia, per mettere l'accento su l'eyeliner
- Per quanto riguarda il fard, bisogna prendere in considerazione la propria carnagione e il tono del rossetto.
- In questo caso ho usato un po 'di fard unito ad un blush Kiko, dai toni rosa pesca.
- SUGGERIMENTO: se usate una base blu sotto il rossetto, i vostri denti risulteranno molto più bianchi... Provare per credere!!! ;)


HAIR : I used curling tongs to get curls and after that I brushed her hair for a very long time in the right direction. For this technique you need a round brush. Hairspray and finished.
CAPELLI:
Ho usato un arricciacapelli per avere ricci morbidi. Dopo averli spazzolati per bene nella stessa direzione, ho ottenuto questo risultato. Per questa tecnica è necessaria una spazzola tonda, lacca e qualche ferrettino, per dare la forma che si desidera al ciuffo. (ferrettini che dopo vanno ovviamente tolti).


Thanks to the incredible Nastassia.Michailovna
Heutiges Thema: Make-Up und OutfitWie macht man das Make-Up der 40er/ 50er
1. Schritt - Grundierung
- Benutze eine Basis um Unebenheiten zu korrigieren und einen besseren Halt für das Make-Up zu bieten
- Hierbei habe eine Nuance heller verwendet um den typisch look der 40er zu kreieren(EVA GAREN - Highlight Foundation 250)
- Um Augenringe abzudecken benutzte ich den CREAMY CONSEALER 606 (EVA GARDEN) und mixte ihn mit der Foundation.
- Um Unreinheiten abzudecken kann man Cover Cream (HORST KIRCHBERGER) benutzen. Das Produkt ist sehr ergiebig und deckt super ab.
- Es ist nicht auf dem Bild dargestellt, aber benutzt ein Puder um das Gesicht mat zu halten.
- Tipp: Benutzt KEINE Schwämme zum Auftragen des Make-Ups, die schlucken viel zu viel vom schönen Produkt
2. Schritt - Augenbrauen und geschwungener Lidstrich
- Um definierte und typisch geschwungene Augenbrauen zu kreieren benutze ich immer den EYEBROW PENCIL 90 (EVA GARDEN). Dieser Stift ist einfach unglaublich, er passt sich an jede beliebige Haarfarbe an, ein Multitalent.
- Um einen geschwungenen Lidstrich hinzukriegen müsst ihr zuerst, den oberen Wimpernkranz entlangfahren. Nun schaut ihr euch den Verlauf eurer Wasserlinie an und führt diesen mit dem Eyeliner weiter je nach Vorliebe. Ihr verbindet die beiden Linien und somit habt ihr den perfekt geschwungenen Lidstrich, der immer symmetrisch zum anderen Auge ist. Je dicker der Strich wird, desto eher geht es in die Richtung des "Rockabilly"- Stils
- Um den Lidstrich zu betonen, benutze ich nur am oberen Wimpernkranz Mascara
3. Schritt
- Um die Lippen ordentlich zu schminken benutze ich immer einen Lippencil. Vor allem bei roten Lippen eignet sich der 15N von EVA GARDEN besonders gut
- Matt ist und war Trend, dafür hab ich den Velvet Mat - Satin Lipstick/ 608 Apple Red (KIKO) benutzt und ihn mit einem Lippenpinsel aufgetragen
- Wichtig beim Blush ist, dass es zu eurer Haut- und Lippenstiftfarbe passt.
- Bei diesem Look verwendete ich nur ein Hauch von Rosa auf ihren Wangen, gerade genug um es zu bemerken.
- TIPP: Rote Lippenstifte mit einem Blau-anteil lassen die Zähne weißer wirken
HAARE:Um diese weichen Wellen nachzumachen braucht ihr einen Lockenstab. Ihr dreht die Haare waagerecht auf und wartet bis sich richtige Locken bilden. Nun lasst ihr sie abkühlen und fangt an mit einer Rundbürste die Haare in die richtige Form zu bürsten. Unten dreht ihr die Haare mit der Büste nach innen ein und fixiert das ganze mit Haarspray. Fertig.
Nastassia & Francesca