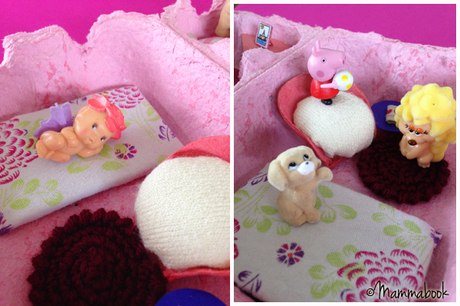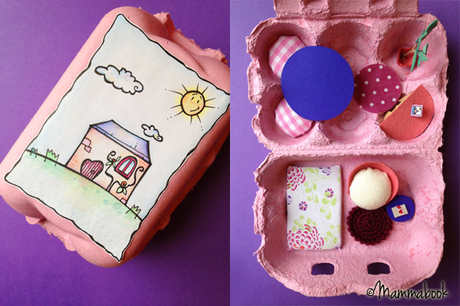
Eccoci giunti alla seconda e ultima parte del tutorial su come realizzare una casetta in una scatola vuota delle uova. Nella prima parte abbiamo visto come decorare la scatola esternamente e come realizzare la camera da letto. Oggi ci dedicheremo esclusivamente al soggiorno e alla sala da pranzo. Alcune delle immagini e delle forme che potete vedere in questo tutorial potete trovarle nel file scaricabile (link più in basso).
Here we hare with the second and final part of the tutorial on how to build a dollhouse inside an empty egg box. In the first part, we saw together how to decorate the box from the outside and how to create the sleeping room. Today we’ll be focusing on the living-dining room only. Some of the images and templates used in this article are available in the downloadable file (link below).
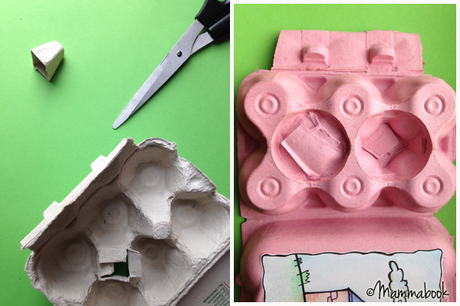
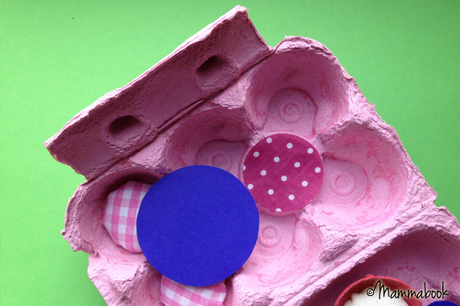
La difficoltà di questa stanza è data dal fatto che le sei sezioni sono separate da due coni alti: vedremo come ‘appiattirli’ e sfruttarli a nostro vantaggio. Cominciamo dal primo cono, quello che diventerà il tavolo da pranzo. Per trasformare il separatore nella base del tavolo, dovrete tagliare il quattro angoli fino a metà altezza; tagliate parzialmente la punta e ripiegate le alette l’una sull’altra fissando con la colla a caldo. Semplice, vero? Prima di incollare il piano del tavolo sarà necessario imbottire le sedie, seguendo le istruzioni che ho pubblicato la scorsa settimana. Ora ritagliate la sagoma che preferite (nel file scaricabile trovate una base a forma di fiore, altrimenti potete tracciate un cerchio aiutandovi con un bicchiere) dal cartoncino e incollatela sulla base. Il tavolo è pronto.
The difficult thing in this room is given by the fact that the six sections are separated by two high ‘cones’: we will now see how to ‘flatten’ them and use them at our benefit. Let’s begin with the first cone, the one that we will turn into a dining table. To transform the separator into the base of the table, cut the corners until half-way; cut off the bottom and fold the sides one on the other. Fix with glue. Isn’t it easy? Before gluing the upper part you will need to create the chairs, following the instructions that I published last week. Now cut a cardboard shape and fix it on the support – if you like, you can find a flower template in the file, or you can draw a circle using a glass. The table is ready.
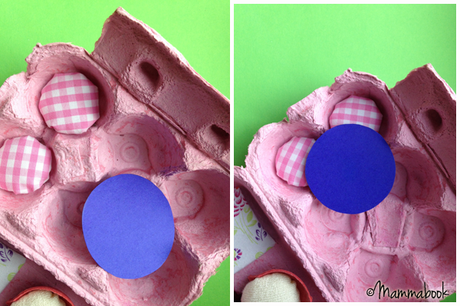
Il secondo cono verrà invece letteralmente nascosto sotto il tappeto: per far questo tagliate i quattro angoli fino alla base, tagliate la parte superiore e richiudeteli uno sull’altro fissando con la colla. Nelle casette che ho già pubblicato, iltappeto era stato creato a partire da delle fettuccia; questa volta, per non stonare con il tappeto in cotone della camera da letto, ho deciso semplicemente di ritagliarlo dalla stoffa (rinforzata per mezzo di carta termoadesiva).
The second cone will be literally hidden under the carpet: to do that, just cut the sides of the cone until the edge, cut off the upper part and fold them one on the other to close the hole. Fix with hot glue. In thehouses I published in the past years, you can see that I made a recycled carpet out of t-shirt yarn; this time, since I already had a delicate cotton carpet in the sleeping bag, I decided to use a shape of fabric (which I made more resistant using some iron-on adhesive).
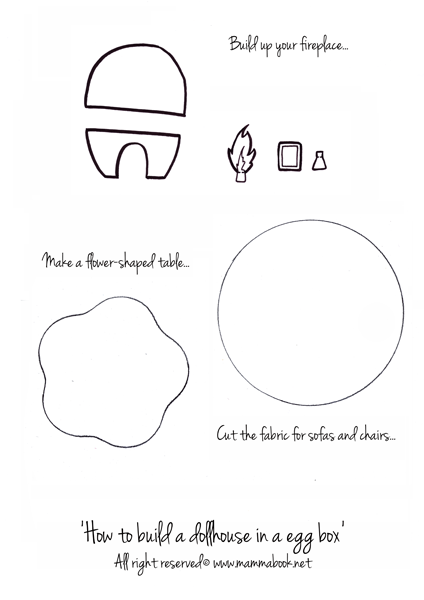
Potete essere molto creativi con il resto della sala: aggiungere altre sedie, tavolini (le istruzioni per realizzarli li trovate nel post della scorsa settimana), mettere una cuccia per il cane o quant’altro. Io ho seguito i miei gusti, e inserito un caminetto e una pianta. Bisogna procedere a tentativi per trovare le misure giuste per il camino, per questo ho deciso di passarvi le mie: potrebbero non essere perfette per la vostra scatola, ma vi daranno comunque una misura di riferimento da cui partire.
You can be quite creative working with the rest of the living room: you may want to add more chairs, a small table (Ialready shown you how to make it), insert a dog-basket or whatever else comes to your mind. I chose a fireplace and a plant. It is a bit complicated to perfectly fit the fireplace, so I decided to give you my ‘sizes’: they might still not be perfect, but at least you have a shape to start with.
Click here to download the file/clicca per scaricare
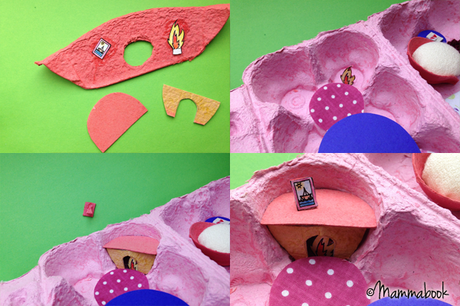
Per realizzare il camino ritagliate e colorate il fuoco, la parte frontale, e la parte superiore. Piegate l’aletta della fiamma e incollatela vicino al bordo in rilievo; se volete essere sicuri che non si pieghi all’interno col tempo, potete nascondere sul retro un batuffolo di cotone. Sistemate le parti del camino intorno al fuocherello e fissatele con la colla a caldo: prima il vano, e poi il piano superiore. Potete decorare il camino aggiungendo elementi a piacere, come ad esempio un libro (abbiamo già visto insieme come realizzarlo) oppure una cornice. Montare la cornice è semplice: incollate gli elementi sul cartoncino e attaccateli tra loro come nelle immagini.
To make the fireplace cut and colour the fire, the front and the upper part. Fold the flap and fix the flame next to the embossed edge; if you want to be sure that it won’t fold with the time you can hide a cotton ball on the backside. Arrange the two part of the fireplace around the flames and fix them with hot glue: first the frame, then the upper part. Decorate as you like, for instance with a book (we saw last week how to make it) or a frame. Building up the frame is easy: glue the parts on some thick paper, cut them and fix them like is shown in the following images.

L’ultimo angolo potrebbe essere riempito da una pianta. Per realizzarla, usate la parte superiore di un cono capovolta a mo’ di vaso. Create un supporto con un bastoncino e incollate le foglie.
The last corner may be filled by a plant or a lamp. To make the plant, use to edge of a cone turned upside down like a pot. Make body with a tiny branch, then glue the leaves.
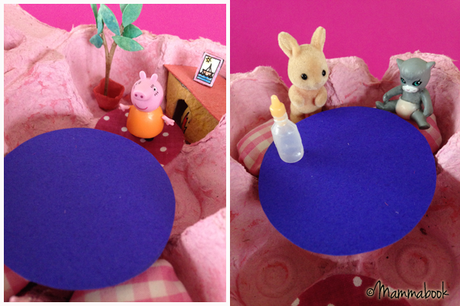
Mi auguro di essere riuscita a mostrarvi quanto sia semplice e versatile questo progetto. Spero che vi divertiate tantissimo a realizzarlo, da soli o con i vostri bambini – e ricordatevi che sarei davvero felicissima di vedere i vostri progetti e di condividerli, e presto di svelerò anche come! Vi ricordate la Raccolta di Riciclo Creativo per Bambini? Bene, quest’anno ho una bellissima novità per voi. Un passo alla volta, e vi svelerò tutto… intanto buon divertimento!
I hope I was able to show you how easy and versatile this project is. Hopefully you’ll have a lot of fun making it – and please keep in mind that I would be superhappy to see what you made, and share your creations! How? Do you remember the initiative Creative Recycling for Kids? Well, I have some good news for you! A step at the time, and I will tell you everything… for now, enjoy this project and have fun!
