 Scroll Down for English Version
Non sapete che soddisfazione! Da queste parti fatico a trovare ingredienti particolari e la pasta fillo è il mio cruccio da sempre, troppo difficile da fare in casa, troppo delicata e così rinuncio sempre a preparare tutte quelle ricette che mi intrigano e la richiedono. Molto meno grassa della sfoglia, ha una consistenza che adoro, la croccantezza delle preparazioni con la fillo non ha eguali, si sposa perfettamente con dolce e salato e la sua leggerezza mi incanta. Qui però non si trova, o almeno nei negozi che frequento non la trovo, ha fatto qualche apparizione fugace per brevi periodi, ma forse sono troppo pochi quelli che la usano e così sparisce. Io che faccio rifornimenti di spezie e a volte anche di verdure durante i miei viaggi all'estero, guardo sempre la fillo con desiderio e disperazione perché proprio quella non c'è modo di trasportarla senza che si rovini. Qualche giorno fa finalmente, girando online, mi sono imbattuta in questo video che dimostra come fare la fillo in casa e mi sono sentita ispirata. Gli ingredienti son basilari e si trovano in tutte le case, avevo anche il sottile mattarello che ho comprato tempo fa e che non avevo ancora avuto occasione di usare. Così mi sono messa di buona lena a provare per vedere se veramente era possibile fare questa pasta in casa. Le dosi date nel video però per me non si sono rivelate ottimali perché con 4 tazze di farina e 1 sola tazza di acqua l'impasto era troppo sodo. Vero è che non era specificato se l'acqua dovesse essere calda o fredda mentre in alcune ricette si parla di acqua calda, non era neppure specificato il tipo di farina e io ho usato la 00. Forse sarebbe stato meglio usare la 0 o una farina di forza, ma tant'è, l'esperimento è riuscito. Ecco le mie dosi:
- 4 tazze* di farina
- 1 tazza e 1/2 di acqua a temperatura ambiente
- 4 cucchiai di olio extravergine d'oliva
- maizena per il piano di lavoro
Intanto ho utilizzati un paio di fogli per prepararmi un pranzo veloce.
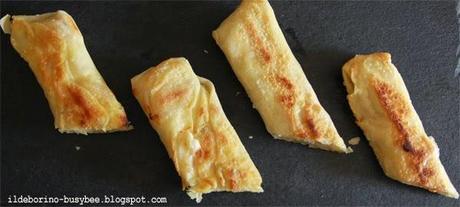
- Ecco come si fanno gli involtini con il formaggio.
- 2 fogli di pasta fillo
- 4 fette di formaggio brie
- 1/2 pera matura
- 1 cucchiaio di olio extravergine d'oliva
- insalatina fresca e rucola per servire
Mettete a scaldare una padella antiaderente.
Piegate in due il primo foglio di pasta fillo e sistemate metà del formaggio lungo la base della pasta, aggiungete sopra 1/4 di pera, arrotolate il foglio di fillo piegando in dentro i lembi laterali per formare un pacchettino lungo e stretto. Ripetete con il resto degli ingredienti.
Versate l'olio nella padella e aggiungete i vostri involtini, fate dorare per 3-5 minuti a fuoco medio, girate delicatamente con una spatola e fate dorare dall'altra parte.
Quando gli involtini saranno ben dorati potete servirli con un'insalatina leggera.
Fate attenzione perché il formaggio sarà caldissimo!
English Version
Great satisfaction!Around here I struggle to find special ingredients and filo pastry is the one thing I miss most. Too difficult to be made at home, too delicate and so I always give up trying so many recipes that intrigue me but are build around it. Much lighter than puff pastry, filo has a texture I really love, the crunchiness of the preparations made with filo has no equal, it’s great with both sweet and savoury ingredients, and its lightness enchants me. But it can’t be found, or at least in the stores I usually do my shopping I can’t find i. It has made brief appearances here and there, but I think there aren’t many people who use it here around so it soon disappeared. I’m known for shopping for spices and even vegetables during my travels abroad, I always look at filo pastry with desire and despair because there’s no way to bring it home as it’s too perishable. A few days ago finally, while I was browsing online, I came across this video that demonstrates how to make filo pastry at home and I was inspired by it. The ingredients are basic ones and usually already present in the pantry, I also have the thin rolling pin I bought some time ago and I haven’t yet had any occasion to use it. So I decided to give it a go and see if it really is possible to make this delicate pastry at home. The quantities given in the video didn’t work for me as the dough was too tough. Truth to be said, it’s not specified whether the water should be hot or cold or what kind of flour it’s used. I used 00 flour, probably it is better to use an all-purpose flour of manitoba, but anyway with just a few adjustments, my experiment was a success.Here are my ingredients:
- 4 cups* of 00 flour
- 1 and 1/2 cup water at room temperature
- 4 tablespoons extra virgin olive oil
- cornstarch
- Here's how to made the cheese parcels.
- 2 sheets of filo pastry
- 4 slices of brie
- 1/2 ripe pear
- 1 tablespoon extra virgin olive oil
- salad and rocket leaves to serve

