E in italiano no? Read me in italian
I've sewn this dress first of all for the Double Challenge "Refashion the Sixties" we decided to do on "Stitch once, Rip Twice" FB sewing group: I've collected some inspiration from my Sixties Pinterest board

Last (but not least) Kollabora and the Fashion Manifesto announced a lovely challenge: Refashion Manifesto Challenge... how could I say no?
(You can vote for me here, if you like my project, by clicking on the little red heart you see on the right sidebar)

As usual, I try to adapt my sewing projects to my necessities (and not vice versa), so it rarely happen that I sew something that I don't truly need!
One other goal I achieved with this dress is to release my very first pattern and tutorial for a woman dress: it's my first time working in a big PDF pattern, so I hope you'll understand if something isn't perfect: I'm planning to release some more FREE pattern soon, so any kind of feedback (again, please be patient!) will be more then appreciated!

Now, into the tutorial!
Let's start from the materials, as usual!
Being a refashion, I used clothes instead of fabrics:
- a pair of wide leg polyester pants, with a nice drape
- an XXL T-shirt
- invisible zipper (30 cm is more than enough, is going to be placed on side seam)
- some fusible interfacing (used to stabilize the violet jersey)
- thread, scissors, sewing machine/serger (optional)
- the pattern
- here's a thumbnail of the pattern, to figure out how to assemble it
First of all: fuse interfacings, if you're using a T-shirt (no pic available, sorry!)
Now let's sew french darts on front sides. It's a strange kind of dart, this one: you have to finish it as it was a normal seam, by cutting out exceeding fabric and pressing it opened (use your ham, it's way more simple), in order to have a smooth result (not so "pointy"!)
Sew also the more ordinary back shoulder darts and press them toward sides

Sew the central violet strip on both front and back, then press outwards s.a.; topstitch these seams.

Sew top front to the assembled central front and top back to the assembled central back; insert the invisible zipper onto right side seam. I have a tutorial coming about how I like to sew on an invisible zipper: waiting for it, use the method you like best! Remember then to close the right side seam below the zipper.

Sew together lower front strip to lower back strip along right side, then press the seam opened.

Sew lower strips to the rest of the dress (I've made it like this to perfectly match violet strips on side seams...)

Now, the lining: sew darts and finish them like you've done on the main fabric (use your ham to press perfectly your newly created darts)

Pin together necklines and armholes of dress and lining, leaving the zipper unzipped; go on stitching until the fabric and the lining ends on the zipper, this will help you turning the lining around the zipper (we're going to finish this zone all by machine, no hand stitch is required here today!)


Sew around necklines and armholes, then clip curves: this will help the fabric to lay flat when turned inside out; turn and press very well, trying not to leave the lining to show out too much.

Pin the lining above the zipper, matching waistline notches and then darts, then sew, turn and press well!
Remember to close the right side seam below the zipper.


Match shoulders seams front/back on the dress, paying attention to the start/end points: they have to match perfectly (this is one of the places you can make the difference between handmade and homemade IMHO). Sew together, press seams opened (use your Sausage Roll and you'll be really pleased!).

Match lining shoulders, slip stitch by hand and give a good press.

If you paid attention to the pattern instruction, you left 4 cm of seam allowances on the violet lower strips; I'm sure you noticed I didn't, so I had to join a strip of fabric (roughly 5 cm height) and understitching it because I don't want it to show on the righ side (why I used the black and not the violet? I had no more violet, simply!!)

Sew left side seam all at the same time, starting from dress hem, finishing with lining hem (matching waistline notches along the way)

Last: hem dress and lining, separately.


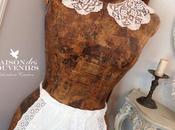
Here you are, the Dress is completed! Do you like it?
If you sew one for you, please share some pic on my flickr board!


E in italiano no? Read me in italian
Ho pensato a questo vestito prima di tutto per la doppia sfida "Refashion anni Sessanta" che abbiamo programmato nel gruppo di cucito FB "Stitch once, Rip Twice": ho raccolto un po' di ispirazioni qui sulla mia Sixties Pinterest board


Come sempre, io cerco di adattare i miei progetti di cucito alle mie necessità (e non viceversa), perciò raramente capita che io cucia qualcosa di cui non ho veramente bisogno!
Un altro obiettivo che mi sono prefissata con questo vestito era quello di pubblicare il mio primo cartamodello e tutorial per un abito da donna: è la prima volta che lavoro ad un grande cartamodello in PDF, quindi spero sarai comprensiva con me se qualcosa non è perfetto: penso di condividere presto altri cartamodelli gratuiti, perciò qualsiasi tipo di feedback (di nuovo, sii paziente!) sarà più che apprezzato!

Ora, il tutorial!
Partiamo dai materiali, come di norma!Essendo un refashion, ho usato dei vestiti al posto della stoffa:- Un paio di pantaloni a gamba larga in poliestere molto morbido e fluente- Una T-shirt XXL- Cerniera invisibile (30 cm è più che sufficiente, andrà cucita sul fianco)- Un po' di teletta termoadesiva (usata per rendere stabile la maglina viola)- Filo, forbici, macchina per cucire/taglia-cuci (opzionale)- Il cartamodello- qui c'è una miniatura del cartamodello, per aiutarti ad assemblarlo!
Prima di tutto: attaccare le telette termoadesive, nel caso usi anche tu una maglietta (nessuna foto, sorry!)
Ora andiamo a cucire le pinces sul fianco. E' uno strano tipo di pince, questa: va rifinita come se fosse una cucitura normale, tagliando i margini di cucitura e stirandoli aperti (usa il tuo tailor's ham, è il modo più semplice), in modo da avere un bel risultato (non così "appuntito" !)Cuci anche le pince delle spalle posteriori e stirale verso l'esterno.

Cuci la striscia centrale viola sia sul davanti che sul dietro; stira verso l'esterno e impuntura a filo queste cuciture.

Cuci il top davanti sulla parte centrale assemblata e il top dietro al dietro centrale assemblato, inserisci la cerniera invisibile nella cucitura laterale. Ho un tutorial in arrivo su come io cucio una lampo invisibile: nell'attesa utilizza il metodo che preferisci! Ricordati di chiudere poi la cucitura laterale destra sotto alla cerniera.

Cuci insieme le due strisce inferiori davanti e dietro lungo il lato destro, quindi stira aperti i margini di cucitura.

Unisci le strisce inferiori al resto del vestito (ho fatto in questo modo per far combaciare perfettamente le strisce viola nelle cuciture laterali ... )

Ora, la fodera: assembla le pinces e finiscile come hai fatto nel vestito (utilizza il tuo tailor's ham per stirare perfettamente le pinces appena create)

Unisci con gli spilli lungo lo scollo e il giromanica il vestito alla fodera, lasciando la cerniera aperta; prosegui la cucitura fino alla fine della stoffa/fodera in corrispondenza della cerniera, questo sarà di aiuto nel rivoltare la fodera sulla cerniera (che rifiniremo a macchina, nessuna rifinitura a mano per la cerniera oggi)


Cuci tutto intorno, poi incidi lungo le curve: questo aiuterà il tessuto a restare piatto quando risvoltato; rivolta e stira il tutto molto bene, cercando di non lasciare uscire troppo sul diritto la fodera.

Fissa con gli spilli la fodera lungo la cerniera, facendo combaciare le tacche indicanti il punto vita e poi le pinces, poi cuci, rivolta e stira bene! Ricordati di chiudere la cucitura laterale destra sotto la cerniera.


Unisci il dietro al davanti lungo le spalle, facendo attenzione ai punti di inizio/fine: devono corrispondere perfettamente (a mio modesto parere, questo è uno dei punti dove puoi davvero fare la differenza tra fatto a mano e fatto in casa). Cuci e stira le cuciture aperte (usa il tuo Sausage Roll e sarai davvero soddisfatta!).

Abbina davanti e dietro della fodera in corrispondenza delle spalle e cuci a mano, poi stira per bene.

Se sei stata attenta alle istruzioni del cartamodello, hai lasciato 4 cm di margini di cucitura per l'orlo delle strisce viola inferiori; sono sicura che avrai notato che io non sono stata così brava, ho perciò dovuto aggiungere una striscia di tessuto (circa 5 cm di altezza) e impunturare da rovescio lungo la cucitura per evitare che scivoli sul diritto (il motivo per cui ho usato il nero e non il viola? Non avevo più viola, semplicemente!)

Unisci ora lungo il fianco destro con una sola lunga cucitura che parte dall'orlo del vestito fino all'orlo della fodera (abbinando le tacche del punto vita lungo il tragitto).

E per finire: orla vestito e fodera, separatamente.


E così il Mod Dress è completato. Ti piace?
Se ne dovessi cucire uno, ti prego di condividere qualche foto qui sul mio gruppo Flickr!
With this post I participate in most of these Linky Party, as usual