Materiali utilizzati:
- cartoncino colorato (qui colore pesca);
- carta colorata da scrapbooking (più è allegra e meglio è);
- foglio bianco in formato A4;
- foglio di vellum;
- fustella (qui a forma di farfalla);
- colla in gel;
- mounting squares (meglio se trasparenti);
- forbici.
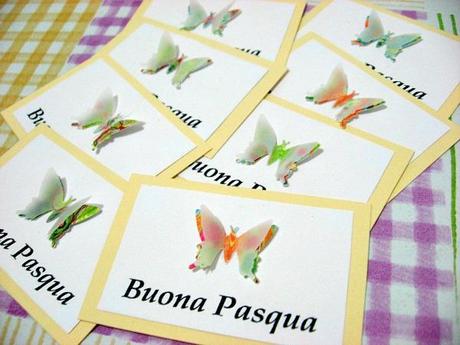
Ritagliate il cartoncino colorato in tanti rettangoli delle dimensioni che preferite (io li ho fatti proprio mini, li trovo più carini), ripetendo l'operazione per il numero di cards che vi servono.Preparate al pc la scritta "Buona Pasqua" ripetuta per lo stesso numero di cards, stampatele e ritagliate il foglio bianco in modo che, se sovrapponete il foglio bianco al cartoncino, rimanga un piccolo bordo visibile del cartoncino (basta qualche millimetro); fate in modo che la scritta sia posizionata sul basso del foglio ritagliato.Attaccando i mounting squares dietro ai fogli bianchi ottenuti, fate aderire i fogli bianchi su ogni cartoncino colorato ritagliato in precedenza.Utilizzate la fustella (nel mio caso quella a forma di farfalla) per creare tante farfalle colorate su una carta colorata da scrapbooking e fate la stessa operazione sul foglio di vellum.Incollate le farfalle di vellum sulle farfalle di carta e piegate leggermente tutte le ali, in modo che sembrino in 3D.Incollate le farfalle 3D subito sopra alla scritta "Buona Pasqua" della base delle mini cards e consegnate il tutto a chi preferite con il vostro migliore sorriso.
Sono mini cards molto semplici e veloci da preparare, ma molto raffinate ed allegre!
~
Still a few days until Easter!If you're in a lack of time and anyway you want to create some nice and just quick card to give to parents and friends, you can use the following tutorial with my last minute idea to create mini cards with Easter wishes and do like me!
Used material:
- colored cardstock (here peach);
- colored paper for scrapbooking (bright is better);
- white paper size A4;
- vellum paper;
- punch (here butterfly-shaped);
- gel glue;
- mounting squares (transparent are better);
- scissors.
Cut the colored cardstock in some rectangles of the desired size (I created it very small, I found it nicer), repeating the procedure for the number of the cards which you need.Write the writing "Happy Easter" at the pc, repeating it for the same number of cards, print them and cut the white paper so that, superimposing it to the cardstock, you can see a small border of the cardstock (you only need some inches).Glueing the mounting squares behind the obtained white papers, let the white papeers adhere onto the ready-made colored cardstocks.Use the punch (in my case the butterfly-shaped one) to create a lot of colored butterflies onto a colored paper for scrapbooking and do the same thing onto the vellum paper.Glue the vellum butterflies onto the colored paper butterflies and lightly curve all the wings upwardly, so that they appear like 3D images.Glue the 3D butterflies just above the writing "Happy Easter" of the basis of the mini cards and deliver the cards to whom you prefer with your best smile.
They're very simple and quick mini cards to create, but they're also very elegant and bright!

Le mie mini cards di Buona Pasqua


