Scroll down for english version

Eccomi, ancora una volta, arrivare all’ultimo minuto perpartecipare alla tappa dell’Abbecedario Culinario della Comunità Europea! …mi ero persa la tappa precedente in Germania ma questa all’Isola di Malta non volevo saltarla! …Malta non l’ho mai vista ma dopo i racconti di una mia amica che c’è stata di recente (e mi ha portato lo strofinaccio che vedete in foto) mi ha proprio affascinato ed incuriosito e spero proprio di visitarla un giorno!
Con l’Abbecedario siamo arrivati alla lettera R di Ross fil forn, uno speciale riso al forno, piatto tipico maltese che ci presenta Lucia del blog Torta di Rose nonché nostra ospite per questa tappa.

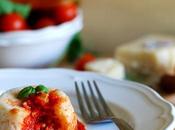
Cercando tra le ricette tipiche di quest’isola mi sono imbattuta nei Pastizzi… famoso e tipico cibo da strada (il tanto popolare streetfood che ora tutti cercano di riscoprire) e sono una specie di panzerotti di pasta sfoglia i cui ripieni tipici sono o di ricotta (sono salati non dolci) o anche di piselli! …all’inizio ho pensato “o che bene.. uso una sfoglia pronta” …ma poi leggendo bene ho capito che non è la classica pasta sfoglia che viene usata ma un impasto diverso, fatto a mano… ma come?… e qui ha continuato la mia ricerca… con la consapevolezza che se volevo fare i pastizzi mai avrei usato la scorciatoia di una sfoglia già pronta e non simile all’originale!
La mia ricerca su come fare la sfoglia per i pastizzi mi ha portato su due strade diverse… online ho trovato ricette “scritte” che preparavano una sfoglia dove il burro freddo a tocchetti andavo inglobato al mix di farina e sale, unendo pian piano acqua e poi lavorando l’impasto delicatamente, stendendolo e facendo i giri come una normale sfoglia. Ma grazie a Youtube ora le ricette possiamo anche vederle e qui ho visto la sfoglia fatta in una maniera completamente diversa. Sia in questo video di una “pastizzerija” famosa, che in in un altro video (qui e qui i video) dove la pasta la fa una signora anziana dalle mani abili a casa sua… la sfoglia si fa preparando prima un impasto di farina, sale e acqua fredda, si stende molto lungo, si spalma di burro/margarina e si arrotola pian piano fino a formare un salsicciotto. Questo salsicciotto viene poi tagliato a tocchetti e schiacciando l’impasto dal centro verso l’esterno i vari strati concentrici si allargano formando un impasto che poi sfoglia.
Io ho optato quindi per quest’ultimo metodo visto su youtube, ritenendolo più attendibile, sebbene non semplice! …ovvio che il mio umile risultato non è uguale a quello originale, però non mi lamento essendo la prima volta che preparavo un impasto simile,che credo (soprattutto guardando abilità e manualità sia del“pastizziere” che della signora nel video) si impari facendo pratica e preparandolo più e più volte!

Per ”ingrassare” l’impasto io ho usato del burro… mentre ho visto che la signora del video usava una famosa margarina chiamata Crisco, nata negli Usa, molto famosa e composta da vari oli vegetali idrogenati. In varie ricette anche scritte per questo impasto ho trovato infatti l’uso della margarina e non del burro. A parte il non approvare l’uso di margarine con grassi idrogenati, ormai di comprovata nocività, avrei potuto optare per una delle margarine senza grassi idrogenati che ci sono ora ma alla fine, avendo del buon burro a casa ho usato quello! …e devo dire che non ne ho nemmeno usato così tanto come nei video ma ho cercato di stenderne un buon strato uniforme sull’impasto (forse ne andava ancor di più?!).
Come dicevo, come primo risultato non mi lamento, credo che ci voglia pratica, l’impasto quando lo maneggiavo era morbido così come lo vedevo nei video ma credo un errore che ho commesso è stato quello di stendere la sfoglia troppo sottile ed una volta arrotolata, assottigliandosi ancor di più, lo spessore dell’impasto che crea poi la sfogliatura si sia perso. Ho comunque ottenuto un impasto friabile e croccante come la sfoglia, con una leggera sfogliatura all’interno. Davvero buono comunque. Altra mia pecca è stata il non avere un tavolo lungo su cui lavorare e dover dividere la stesura e imburratura in due fasi… ah come vorrei avere una di quelle cucine da sogno con piano da lavoro gigante! 
Non ho foto dei passaggi visto che già ero impacciata nello stendere l’impasto e prepararlo ci mancava solo che tirassi fuori la macchina fotografica  …ma i video linkati sopra vi fanno vedere egregiamente come va fatto l’impasto per i pastizzi. Il ripieno l’ho fatto semplice, quello di ricotta e basta… delizioso e delicato!
Che dire… voglio riprovarci sicuramente per padroneggiare sempre più questo impasto davvero speciale che mi ricordo quelle delle sfogliatelle ricce napoletane! …altra cosa buona da provare a fare! 
Intanto vi lascio alla ricetta ma soprattutto all’idea di provare anche voi questo buonissimo “street food” maltese, magari variando anche il ripieno! …e, come dicevo …per vedere al meglio la procedura cliccate Qui, oppure Qui e Qui! 

Pastizzi ta ‘l-irkotta
- 250 gr di farina
- 100 gr di burro circa a temperatura ambiente
- 9/10 cucchiai d’acqua fredda
- Un pizzico di sale
- 250 gr di ricotta
- 1 uovo
- Sale e pepe
Lavorare la farina con sale e l’acqua, unendo un cucchiaio alla volta, fino a formare un impasto morbido e liscio. Stendere l’impasto su una superficie leggermente infarinata creando una lunga sfoglia e larga circa 20 cm. Con le mani stendete il burro morbido su tutta la lunghezza della sfoglia. Partendo da una estremità della sfoglia iniziate ad arrotolare la sfoglia, tirandola leggermente e creando un salsicciotto sempre più lungo. Arrotolate il salsiciotto su se stesso, mettetelo su di un piatto, spalmate altro burro sopra e copritelo con della pellicola. Metterlo a riposare in frigo. Preparare il ripieno mescolando la ricotta con l’uovo sale e pepe. Riprendere l’impasto del frigo, srotolare ilsalsiciotto e ricavare dei pezzi grandi come una pallina da golf. Schiacciarli dal centro verso l’esterno creando una specie di coppetta tonda. Riempirla con l’impasto e richiuderlo a mezzaluna. Posizionare i pastizzi su una teglia da forno coperta con carta forno e cuocerli a 200° per circa 25 minuti o finchè ben dorati.


Maltese Pastizzi
Here I am, once again at the last minute, posting a recipe for the European Community ABC (a culinary journey through the EC countries) I missed the previous stop-over in Germany, but couldn’t miss this one in Malta!… I’ve never visited it but after the stories of a friend of mine who was there recently (and brought me the towel you see in the picture) I was so fascinated and intrigued by this country that I hope to visit it one day!
With the ABC we are now arrived at the letter R of Ross fil forn, a special baked rice dish typical of Malta and it has been prepared and presented by Lucia of Torta di Rose blog who is our host for this stop-over.
Looking through the recipes of this island I discovered these Pastizzi … a famous and typical maltese street food, a kind of puff pastry turnovers usually filled with or ricotta cheese (salted, not sweet) or even peas! At first I thought … “that’s good … I can use a ready made puff pastry” … but then I realized that they don’t use a classic puff pastry dough but a different one …of course hand-made! … but how? … and so I went on with my research … with the knowledge that if I wanted to do pastizzi I shouldn’t use the shortcut of a ready puff pastry but I had to try to make the original one!
My research on how to make the dough for the pastizzi took me on two different roads … online I found “written” recipes which prepared a dough where the cold butter cut into small pieces was incorporated into the mix of flour and salt, adding water slowly and then gently working the dough, rolling it out and folding it as a classic puff pastry. But nowadays, thanks to Youtube, we can also see recipes and in fact I saw the pastizzi dough made in a completely different way! Both in this video of a famous ”pastizzerija“ and in other videos (here and here ) of an old lady working the dough at hers… the dough was made mixing flour , salt and cold water, rolling it out into a very long sheet, spreading butter/margarine on it and then rolling it up into a kind of long sausage. This sausage is then cut into pieces, each piece is pressed down from the center, spreading this way all the various concentric layers to form a pastry which will puff when baking.
I opted for the latter method I’ve seen on youtube, which Iconsidered the most reliable, though not simple at all! Obviously… my humble result is not the same as the original, but I’m not complaining since it was the first time I was preparing this dough, which I think (especially watching the ability and skills of the”pastizziere” and the lady in the video) you can master only with a lot of practice and preparing it over and over again!
In order to “fatten” the dough I used butter … and I saw that the lady in the video used a famous shortening called Crisco, which we don’t have in Italy but I know is very popular in the U.S. In various “written” recipes for this dough in fact they called for margarine and not for butter. Anyway as I don’t like the use of margarine with hydrogenated fats, I preferred to use some good butter I had at home, even if I can find over here some very good margarines without trans fats as well!… I have to say that I didn’t used so much butter as in the video but I did spread a good even layer on the dough (maybe I had to spread even more!?).
As I said, as first result I’m not complaining, I think it takes practice! When I handled the dough it was soft as I saw in the video but anyway I think that a mistake I made was to roll out the dough too thin and once rolled up, stretched and thinned even more, the thickness of each layer, which then creates the flaking effect, has been lost. I still got a crumbly and crunchy pastry with a slightly flaking on the inside. Really good anyway. My other“flaw” was not having a long table to work on and so I had to divide the rolling out and butter spreading in two stages… oh I sooo wish to have of those dream kitchens with a huge worktop! 
I didn’t take photos of the different steps as I was too busy spreading the dough and buttering that I really couldn’t use also the camera  …but the videos linked above will explain very well how to make the pastizzi dough. The filling I made was the simple one, with ricotta cheese … just delicious and delicate!
What can I say … I will surely try to master more and more this really special dough which reminds of the Sfogliatelle ricce from Naples!… another sweet and delicious thing to try! 
I leave you with the recipe but especially with the idea of trying this delicious maltese ”street food”, maybe trying different fillings too! And … as I said … to see the best procedure , click here , or here and here! 

Pastizzi ta ‘l-irkotta
- 250 gr flout
- 100 gr butter, soften
- 9/10 tbsp of cold water
- A pinch of salt
- 250 gr ricotta
- 1 egg
- Salt and pepper
Work flour with salt and water, one tbsp at time until you get a soft and smooth dough. Roll out the dough on a slightly floured surface, into a long sheet , about 20 cm wide. With your hand spread soft butter onto the dough surface. Starting from one end of the long sheet roll up the dough into a kind of sausage, stretching it slowly until it forms a kind of long sausage. Roll up the sausage into a kind of snail, spread extra butter on top and place it on a dish, cover with film and place it in the fridge to rest. Prepare the filling mixing ricotta with egg, salt and pepper to taste. Unroll the sausage and cut it into a golf ball size pieces. Press and flat each piece from the centre of the piece, on order to spread the layers outside. Form a kinfd of round cup and fill it with a spoon of ricotta mixture. Close the pastizzi, sealing the edges and place them on a baking tray covered with parchment paper. Bakepastizzi in preheated oven at 200° for about 25 minutes or untilgolden.