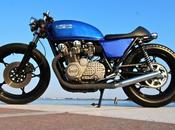
When we admire a finished vintage cafe racer, perfectly sleek as it was just released from the factory, sometimes we forget the countless working hours spent on it. This is particularly true when we refer to a original British lady from the fifties or the sixties. Garry Laurence told Inazuma Café the detailed story of the build of this Triton. This reminds us to think twice before starting a project like this, justifies the considerable amount of money we are often required to purchase one of this bikes and demonstrate the huge passion which is behind these restorations. Just read the rest of this post if you don't believe me.
Quando ammiriamo una autentica cafe racer d’epoca, tirata a lucido come se fosse appena uscita dalla fabbrica, speso ci si dimentica delle innumerevoli ore di lavoro che è costata. Questo è particolarmente vero quando ci si riferisce ad una autentica signora inglese degli anni Cinquanta o Sessanta. Garry Laurence ha raccontato all’Inazuma Cafè la storia dettagliata della costruzione di questa Triton. Una storia che ci invita a pensarci due volte prima di iniziare un progetto come questo, che giustifica la notevole quantità di denaro che viene spesso richiesta per l'acquisto di una di queste moto e dimostra la grande passione che c'è dietro questi restauri. Leggete il resto se non mi credete.

“Building Café Racers – Garry Says – is an art form. They need to look good but, at the same time, have form and functionality”. When Garry found this bike in a garage “this one had none of that". That's the reason why he called this bike Metamorphosis. "The saving grace was the engine came with an invoice for a £2000 rebuild by Norman Hyde albeit ten years ago. It had a good frame Norton wideline frame short road holder forks with conical rear hub and a John Tickle front brake, as for the rest it, it all had to go. I sold the oil and petrol tank, seat, exhausts, front brake, scrapped the handle bars, chain guard and engine plates so there was not much left, but even then it looked better. I started to think of the very things that make a good Café Racer, design, form and function, its no good looking good if it doesn’t go. As they say “it must do what it says on the tin” and that’s what I wanted to achieved. (…) I wanted to build an eye catching triple Triton. I opted for TZ front brake with the short road holders de lugged with Manx front mud guard and Y bracket with standard spring covers. Steering damper was a fitted hydraulic unit. Front and rear hubs are laced to stepped 18” Akront alloy rims. I opted for swan neck clip ons with standard Norton head light brackets. I made new clock holders but was not satisfied with the look: they needed to be lower to give the front end balance. So they were scrapped and I went for Commando holders filling the bottoms in with alloy plates so all you see is the Speedo/rev counter cable and the illumination bulb wire to give a finished look. The bike came with a Dresdsa swinging arm so I kept it and spaced the new rear mud guard to give it symmetry. A new rear number plate holder was made to fit properly with the standard Lucas rear light unit. A de lugged and polished a Triumph Daytona aluminium side stand and bracket was welded to the frame. This just about finished the specification for the rolling chassis".
 "The engine plates fitted were just about the worst I have ever seen along with the foot pegs and standard T150 exhaust system, they all had to go. I spent a number of hours designing the engine plates to complement the engine. I made several designs and the ones fitted were the most pleasing to the eye as they curve under the engine and pick up on the central mounting under the engine but allow access to the engine oil filter. The plates also provide the rear sets mountings for the modified Triumph Daytona foot rest hangers and Barleycorn engineering foot pegs etc. Satisfied with the engine mounting, next came the oil pipes which, let me tell you, were an absolute nightmare. Having owned a standard Triumph T150 I thought the oil pipes were a plumber’s nightmare, just an awful design. With the oil cooler mounted on the front down tubes at the front and the oil tank mid way down the frame I spent the next two weeks playing with the oil pipes routing and re-routing them, it drove me mad, I just didn’t want to see them. Having opted for a Manx petrol tank and seat with one off designed side panels these were complemented with a Manx elephant’s foot oil tank which had to be modifed three times. The first time so I could get it past the offside of the engine. The second time for the feed and return for the oil pipes and the third time to clear the three carburettors. So, the oil feed to the engine drops out of the bottom of the oil tank straight to the engine, no problem there. The return is fed from the bottom of the engine through the oil tank mounting plate, passes through one of the conventional oil tank mounting tubes and runs along the top of the frame feeding the rockers and into the oil cooler, out of the oil cooler back to the oil tank along the other side of the frame. All pipes are clipped to the frame, sounds easy, it wasn’t, but it is neat and tidy. I made the mounting brackets for the three coils and the Boyer electronic ignition mounting them just behind the oil cooler. As with all my Café Racers a standard feature is all the wiring is run through the frame and clip ons. Turning my attention to the exhaust system next in collaboration with John at Campbell exhausts came up with the exhaust system, a three into two with up swept side winder megga’s in stainless steel. There are a thousand and one jobs I have not mentioned but with the dry build complete Colour schemes can make or break the look of a bike, having just finished The VOODOO in black and was really pleased with the look opted for the same again black with chrome lettering. I was particularly pleased with the response the Voodoo “Spirit of the Sixties V” got when people saw it, because it was so different from the normal silver".

"With the dry build finished as far as it could be it was time to strip for paint and polishing. While frame and tanks etc were away for powder coating and painting I set about stripping the top half of the engine off for repairs to some of the fins which were broken. Having made and repaired the fins the whole lot was soda vapour blasted to give that new look. I re-polish everything prior to re-assembly With the seat and tank back from the paint shop Lee from Viking Vinyl’s came over to discuss the seat cover design as he had made the one for the Voodoo. Again I didn’t want to see the tank fixing or the oil filler cap which meant putting a raised curved front on the seat cover and making a cover for the oil tank recess along with the embroidery on the seat back. Reassembly is straight forward providing that all the pre build work has been completed 100% because it’s too late to start modifying things at this stage. That’s not to say I don’t tweak things I do, I decided that running a 4 leading TZ front brake anchored by the quarter stud front mudguard fixing was not sufficient, so they were taken out to 8mm with steel inserts a sensible mod that I will use in future. Care, patience and taking your time are the key element at this stage if you don’t something is going to get damaged. The day arrived to start the machine, it didn’t. Petrol. The lack of it was surely the problem. So I stripped the three concentric carburettors off as I suspected the pilot jets were blocked having stood for about ten years. I had mistakenly only given them a superficial clean as they looked brand new. I was speaking to Steve Blackwell and he advised the only way to clean them properly is to drill out the factory blanks to get to the pilot jet to clean it. Taking his advise I stripped them down drilled out the plugs and put them in my ultra sonic cleaner over night followed by a good wash in thinners and a blow through with an air line. This appeared to do the job Light could be seen through the pilot jet. Refitted the engine still would not fire. I had checked the Boyer ignition timing as per the fitment sheets and workshop manual, all appeared correct. You cannot really get it wrong? It was spot on as per the instructions? I was not convinced I advanced the timing manually until it fired up and it ran for a couple of minutes, then it cut out and just wouldn’t start. No Spark. Eventually I traced the fault to the electronic ignition system which had an intermittent fault on the stator plate firing one minute and not the next. I decided to replace the whole system as the one fitted had come with the machine and sods law it was the only electrical part I had used. There’s a lesson there somewhere! With the new Boyer electronic ignition system fitted it fired up and ran very well, a small adjustment of the carburettors and it ticked over a treat. The amp meter was not showing a charge, on testing the alternator field windings there was an open circuit. I fitted a new alternator which cured the problem. I had a healthy charge across the amp meter. This completed the build of Metamorphosis: Spirit of the Sixties VI”.