Questo tutorial è stato postato per la prima volta nel Refashion di Luglio, una serie sul riciclo degli abiti apparsa su House of Estrela. Se te lo fossi perso, lo puoi ora trovare qui! E in più ora è anche in italiano... che so che in molte apprezzano ;)
E in italiano no? Read me in italian
OMG, I'm so excited being part of all that fun... When Magda Estrela asked me to be a guest blogger on her blog on her Refashion July series with all that Stars... I was wondering if she was
Really Asking It To Me... Wow!!!
Then, the second phase, after the Joy, was Terror:What Can I Do?
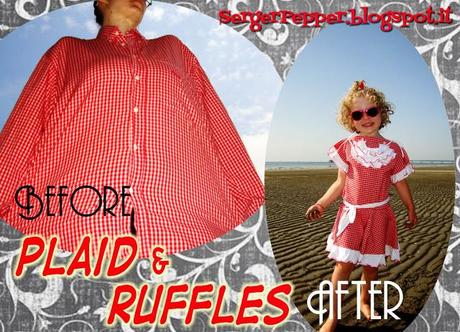
Simple: Plaid and Ruffles... Can't Be Wrong!
So I took one of my favorite shirts of the 90's, when a shirt had to be waaay bigger than your size to be cool, and decided to make a dress with it, for My LilPotato... But an original one!So here we are: a detailed tutorial to share with you, if you want to make one...
What you need:
- a shirt (the larger, the better!)- a white t-shirt (or scraps of it, you need it for the ruffles!)
- thread, scissors & co.
Let's start!
I like all those dad shirts to daughter's dresses I see on Pinterest, but I wanted to do something different... so I took My Shirt and started turning my head around to see it from different angles and...Bang!
The Top
Start cutting apart my shirt back and front, along side seams; from the front half, folded along button list, cut the silhouette of a fitting top (just a little larger, being a knit top to be cut on a wooven fabric...), down to old side seams.
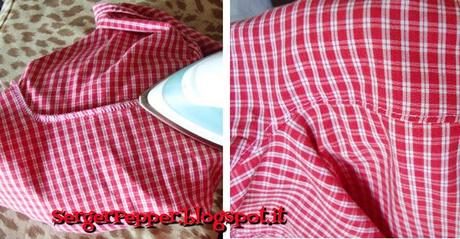
Sew side seams right sides facing, then press toward back (use your tailor's ham!) and topstitch them:

The Skirt
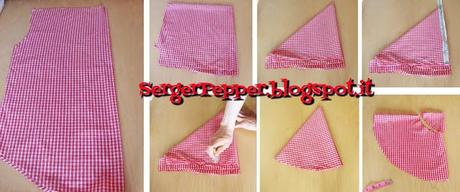
Take the back half, folded in half, quarter, eigth then cut in circular shape using a measure tape like a drawing compass. I'm making a 4 years old dress, so I use the longer radius I can: cut your measuring how long you want your skirt to be!Cut a smaller circle inside, measuring your model's hips and dividing this number for 6.28 (2 x π)... now you have the radius!!
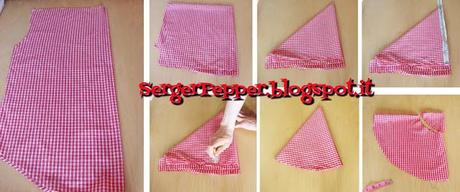
Add top to skirt, marking quarters with pins and matching them. If your skirt circumference is bigger than top one, gather it a bit with a row of machine basting (then pull bobbin thread) before matching pins and sewing on. Remember to press seams toward the top and topstitch like you did on side seams!
Now: the ruffles!
Take a white t-shirt and cut strips orizontally.I made 8 cm high skirt ruffles strips; for the lenght, measure your skirt hem and multiply it for 1,5-2. Join the strips in circle with a french seam to enclose any raw edge. With your serger (or sewing machine) and contrasting thread, make a rolled hem on one of the long edges. Mark every eigth of the edge of both ruffles and plaid fabrics.
On sleeves, measure the hem lenght and multiply for 1,5; add to this lenght 2 times your strip height (I've made these a little lower than the hem ones); make rolled contrasting hem here too, then fold shorter edges like this and mark halves with a pin:
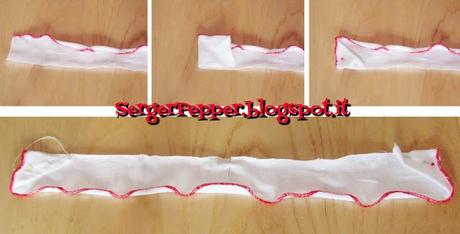
On all the ruffle pieces, machine bast with a long stitch and no tension along the raw edges, then pull bobbin thread and distribute evenly the gathering...
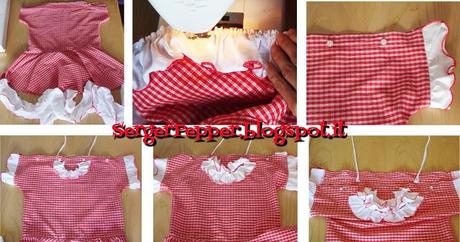
Match half point and ending points on both ruffles and plaid fabrics (on sleeves) and 1/8 pins (on skirt's hem), then sew, press seam and topstitch, as usual.
Ruffled bib
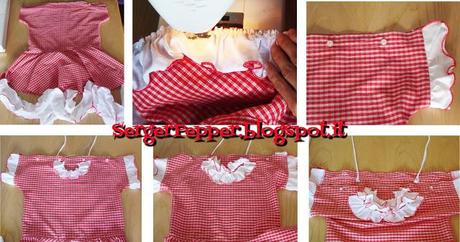
Make a contrasting rolled hem on 3 white t-shirt strips, machine baste them and ruffle pulling bobbin thread, then pin and sew in place, arranging ruffles evenly distributed; fix 4 slim t-shirt strips to the neckline, as noodle straps... ta-dah!
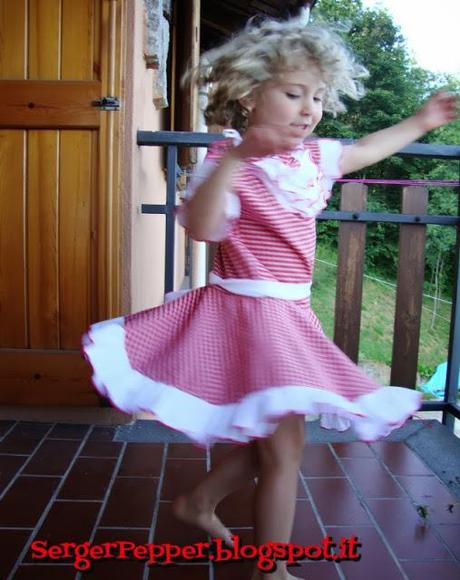
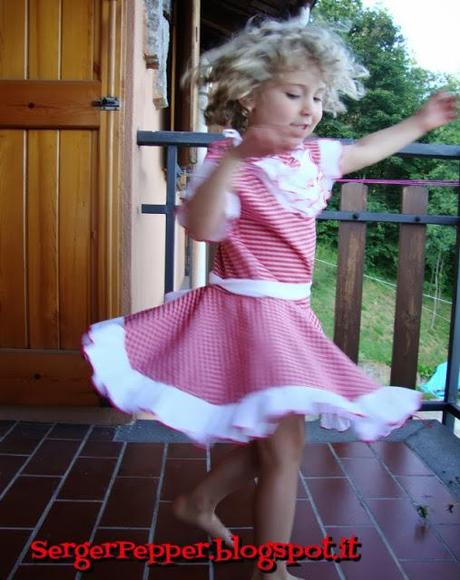
Look at the twirl factor... it's always a winner with a 4 years old girl!!!
Thank you Magda for the opportunity... it's been a huge pleasure :)
If any of you is sewing a dress with this tutorial, please share on my Flickr pool
If you liked this tute, please consider follow me by email, so you won't loose any update from SergerPepper
E in italiano no? Read me in italian
O Mio Dio!!! sono così entusiasta di essere parte di tutto ciò ... Quando Magda Estrela mi ha chiesto di essere una guest poster sul suo blog all'interno della serie Refashion July, con tutte quelle stelle del settore... Mi sono chiesta:
Davvero Lo Chiede A Me ... Wow!
Poi, la seconda fase, dopo la gioia, è stata il terrore:
Che cosa posso fare?
Semplice: Quadretti e Volants... E vado sul sicuro!
Così ho preso una delle mie camicie preferite degli anni 90, quando una camicia doveva essere mooolto più grande della propria taglia per essere cool, e ho deciso di farne un vestito per La Patata
... Ma originale!
Ed eccomi qui, con un tutorial dettagliato da condividere con te, se ne vuoi fare uno simile ...
Quello che ti serve:
- Una camicia (più e grande, meglio è!)- Una t-shirt bianca (o parti di essa, serve per i volant!)
- Filo, forbici & co.
Cominciamo!
Mi piacciono davvero tanto tutte quelle camicie di papà che si trasformano in abiti della figlia che vedo su Pinterest, ma volevo fare qualcosa di diverso ... così ho preso la mia camicia e ha iniziato a girare la testa di qua e di là per vederla da diverse angolazioni e ...Bang!
Il Top
Inizia separando la mia camicia lungo le cuciture laterali; dalla metà anteriore, piegata lungo il listino dei bottoni, ritaglia la sagoma di un abito/maglietta dalla misura adeguata (io lo ho fatto un po 'più grande, essendo un modello in maglia da tagliare su un tessuto... ), fino alle vecchie cuciture laterali.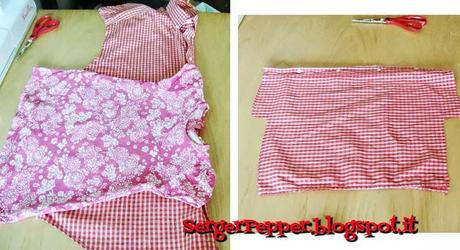
Cucire i margini laterali diritto su diritto, quindi stirare verso il dietro (usa il tuo prosciutto del sarto!), e impunturare la cucitura.
La Gonna
Prendi la metà posteriore, piegala a metà, poi in quarti e ottavi quindi tagliala in forma circolare usando un metro da sarta come un compasso improvvisato. Io sto facendo un vestito per una bimba di 4 anni, perciò uso il raggio più lungo che posso: taglia la tua misura n funzione della lunghezza finita desiderata per la gonna!Taglia un cerchio più piccolo concentrico, misurando la circonferenza fianchi della tua modella e dividendo questo numero per 6,28 (2 x π) ... ed ecco il raggio!
Unisci il top alla alla gonna, segnando con gli spilli i quarti di circonferenza su entrambi i bordi da unire. Se la circonferenza della gonna è più grande del top, arricciala un po' con una fila di imbastitura a macchina (quindi tira filo inferiore) prima di abbinare gli spilli e cucire. Ricordati sempre di stirare le cuciture verso la parte superiore e impunturare come le cuciture laterali!
Ora: i volant!
Prendi una t-shirt bianca e ricavane strisce, tagliandola in orizzontale.
Io ho fatto strisce alte 8 centimetri per i volant della gonna; per la lunghezza, misura l'orlo della gonna e moltiplicarlo per 1,5-2. Unisci le strisce in cerchio con una cucitura all'inglese per racchiudere i bordi che potrebbero sfilacciarsi.
Con la tua taglia-cuci (o macchina da cucire) e filo in colore contrastante, crea un orlo arrotolato su uno dei bordi lunghi. Segna gli ottavi sui due bordi da unire (quello senza orlo del volant e l'orlo della gonna) usando spilli, frixion pen o marche di filo.
Per le maniche, misura la lunghezza orlo e moltiplica per 1,5, aggiungendo a questa lunghezza 2 volte l'altezza della striscia (che ho fatto -a occhio- un po' più bassa rispetto a quelle dell'orlo gonna); creare anche qui un orlino a contrasto, quindi piegare i bordi più corti così come in figura, ottenendo un simpatico dettaglio e di non avere bordi grezzi.
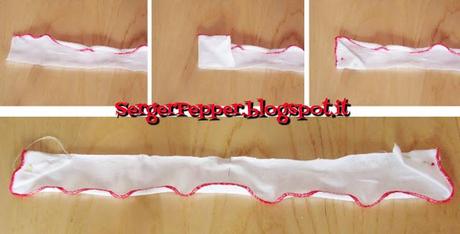
Su tutti i volant, imbastire a macchina con un punto lungo e nessuna tensione lungo i bordi grezzi, quindi tirare filo della bobina per distribuire in modo uniforme l'arricciatura.
Appaiare il centro e gli estremi sui bordi da unire (sulle maniche) e gli spilli posizionati sugli ottavi di cerchio (sull'orlo della gonna), poi cucire, stirare cucitura e impunturare, come al solito.
Volant sul petto:
Fare un orlo arrotolato contrastante su 3 strisce ritagliate dalla solita t-shirt bianca, imbastirle a macchina ed arricciare tirando filo della bobina, quindi appuntare e cucire a posto, distribuendo uniformemente l'arricciatura; fissare 4 striscioline di maglietta alla scollatura, per dare l'effetto ottico di una canottierina a spalle fini che spunta.
Guarda un po' come si volteggia ... è sempre un fattore vincente con una 4enne!
Grazie Magda per l'occasione ... è stato un enorme piacere :)
Se decidessi di cucire un vestito con questo tutorial, ti sarei grata se decidessi di condividerlo nella mia pool di Flickr
Se ti è piaciuto questo tutorial, considera l'idea di seguirmi via email, per essere sempre aggiornata sulle novità di SergerPepper!


