La settimana scorsa vi ho fatto vedere come creare un cartamodello di leggings da un paio che già tieni. Ora vi faccio vedere come usarlo per cucire i tuoi leggings fantastici. Come per il cartamodello, li faccio per mia figlia uguali a quelli che ho fatto un anno fa per me (ed è da un anno che voglio fare questi due tutorial!).
Last week I showed you how to draft a leggings pattern from a pair you already have. Now I'll show you how to use that pattern to sew your fabulous leggings. As with the pattern, I'm making them for my daughter exactly like the ones that I made myself a year ago (and I've been wanting to write these two tutorial for the past year!).

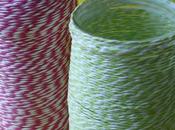
Parliamo prima del tessuto. Se stai cucendo pantaloni normali, puoi usare qualunque tipo di stoffa che vuoi, ma per i leggings serve un tessuto elasticizzato, un jersey. Ho trovato questo taglio di tessuto qualche anno fa al mercato e lo amo tanto, anche se non è 100% cotone. Guarda bene il tuo tessuto. Vedete quelle coste? Vorrete che vanno in verticale sul capo. Un'altro modo per capire come orientare il cartamodello sul tessuto è di tirarlo leggermente. Alcuni tessuti elasticizzati si distendono sia in verticale che in orizzontale. Vorrete che il tuo si distende di più orizzontalmente. Credo che questa regola valga per qualunque progetto cucito che si fa, ma se sapete di qualche eccezione, fatemelo sapere!
First let's talk about fabric. If you're sewing normal pants, you can use whatever fabric your heart desires, but for leggings you need a stretchy fabric, like a jersey. I found this cut of fabric a few years ago in my town's outdoor market and I just love it, even if it's not 100% cotton. Look closely at the fabric. See those ribs? You're going to want those to go up and down vertically on your garment. Another way to figure out how to orient your pattern on the fabric is to gently stretch it. Some elasticized fabrics have a four-way stretch, so both vertically and horizontally. You'll want yours to stretch more horizontally. I think this rule is valid for any sewn project, but if you can think of any exceptions, do let me know!

Uno dei motivi per il quale mi piace usare della carta semi-trasparente per fare il cartamodello è che si può intravedere il tessuto sotto e meglio sistemare il cartamodello. Non è importante per un tinto unito, ma se hai una fantasia geometrica come questa, è meglio che la parte centrale del pezzo sia dritto verticalmente, così la parte sul fianco esterno delle gambe è diritta.
One of the reasons I like using semi-transparent paper for pattern making is that you can see the fabric a bit through the paper and therefore better position it. It's not so important for solid colors, but if you're using a geometric print like this one, it's better if the central part of the piece is straight vertically so that the outside of the legs is straight.

Piegate la stoffa, facendo attenzione che la fantasia sia diritta sia avanti che sul retro, e tagliate la forma. Così ne usciranno due con un solo taglio.
Fold your fabric, making sure that the print is straight on both front and back, and cut out your shape. This way you'll get two pieces with a single cut.

Se invece volete utilizzare meglio il tessuto o avete un pezzo troppo stretto per piegare, si deve tagliare la forma due volte. Ma, occhio! Il cartamodello non è simmetrico, quindi si deve girarlo sotto sopra per il secondo pezzo (come nella foto sopra).
If you prefer optimizing your fabric or if you have a piece that's too narrow to fold over, you need to cut the pattern out twice. But be careful! The pattern isn't symmetrical, so you have to turn it upside down for the second cut (as in the above photo).

Ecco i vostri due pezzi, che dovrebbero essere un'immagine speculare.
And here are your two mirror image pieces.

Si piega ciascuno a metà, alla rovescia, unendo i due lati con gli spilli, ma solo la gamba fino al cavallo.
Fold each one in half, wrong sides out, pinning together the two side edges up the leg til the crotch.

Se le punte del cavallo si uniscono perfettamente, complimenti! Se non lo fanno, pazienza. Uno dei pregi dei tessuti elasticizzati è che si possono spesso fare dei piccoli errori!
If the tips of the crotch match up perfectly, nice job! If they don't, don't sweat it. One of the nice things about stretchy fabrics is that they're pretty forgiving of little mistakes!

E cucite considerando il margine di cucitura usato nel cartamodello. Io preferisco usare la macchina taglia e cuci che, appunto, taglia il tessuto in eccesso e crea una cucitura che si distende. Con una macchina da cucire normale, consiglio di usare una cucitura che si distende, tipo lo zig zag. In teoria, se cucite nella direzione delle coste, potresti anche cucire diritto. In pratica, se fate una cucitura diritta, sicuramente qualche volta, tirando su i leggings in fretta dopo aver usare il WC perché sentite i bimbi che fanno casino nell'altra stanza, strapperete le cuciture. Fidatevi di me. Il mio primo leggings avevo fatto così e ho dovuto rifarli completamente perché si erano riempiti di aperture nelle cuciture.
And sew taking into consideration the seam allowance used in the pattern. I prefer using an overlock machine which not only snips off excess fabric but also makes a nice stretchy seam. If you use a regular sewing machine, use a stitch that will stretch, like a zig zag. In theory, if you sew in the direction of the ribs, you can also sew a straight stitch. In practice, if you straight stitch, be assured that at some point, yanking your leggings up after having used the toilet because you hear the kids getting into some sort of mischief in the other room, you'll rip those straight seams. Just trust me on this. I sewed my first pair of leggings like that and I ended up having to completely resew all the seams because they were all ripped open in various places.

Girate una gamba nel modo giusto, non alla rovescia (ci sarà un modo per dire il contrario di "alla rovescia", no...?).
Turn one leg right way out.

Infilate quella gamba non-alla-rovescia dentro la gamba alla rovescia, facendo attenzione che le due cuciture si trovano nello stesso punto. Fissatele con gli spilli.
Slip the right-side-out leg inside the wrong-side-out leg, making sure you match up the two seams and pinning them.

Poi unite il resto dei bordi e spillate.
The join up the rest of the edges and pin away.

E cucite, sempre con cucitura che si distende. Si cucirà sopra le estremità delle prime cuciture.
And then sew away, again with some sort of stretchy stitch. You will stitch over the ends of the first seams.

Tirate la gamba fuori e voilà! Qualcosa che sembra davvero leggings! A questo punto potete anche provare i leggings per controllare che le gambe non siano troppo larghe o strette, ma non fate troppo caso alla parte superiore.
Pull the legs outside of each other and check it out! Something that actually resembles leggings! You can even try them on at this point to make sure the legs aren't too wide or tight, but don't pay much attention to the top part.

Ora finiamo il girovita e gli orli. A me piace usare l'elastico alto 2 cm per questo tipo di progetto.
Now lets finish off the waistband and hems. I like using 2 cm wide elastic for this type of project.

Ci sono due modi, ma le misure esatte dipendono dai margini di cucitura del cartamodello. Ho stirato verso l'interno prima un pochino. (In teoria doveva essere 5 mm perché avevo aggiunto 3 cm nel mio cartamodello, ma l'ho piegato di più.) Poi si piega di nuovo 2 1/2 cm (se usate l'elastico di 2 cm), stirate e spillate.
There are two ways to do this, but the exact measurements depend on the seam allowances of the pattern. I ironed the edge inwards a little. (In theory it should've been by 5 mm because I'd added 3 cm in my pattern, but i actually folded in more.) The fold inwards again by 2 1/2 cm (if you're using 2 cm wide elastic), iron and pin.

Il modo più pigro è di rifinire il bordo con la taglia e cuci o con lo zig zag (o non rifinirlo proprio!)...
The lazy way is to finish off the edges with the overlock machine or zig zagging (or not finishing them off at all!)...

...e di fare solo la seconda piega verso l'interno, nel mio caso di 2 1/2 cm, stirate, spillate.
...and just do the second fold inwards, in my case by 2 1/2 cm, iron, pin.
 Poi si cuce. Qui deve essere per forza una cucitura elastica, tipo zig zag. A me piace usare l'ago gemello che crea una doppia striscia esterna e permette di distendersi il tessuto. Ecco gli orli...
Then sew. Here you definitely need a stretchy stitch, like a zig zag. I like using a double needle which creates a nice double line of stitching outside and allows for a good deal of stretching. Here are the hems...

...e il girovita massacrato. Non fate i pigri come me; controllate sempre la tensione dei fili, soprattutto con le stoffe elasticizzate! Se no, le cuciture si saltano, non si fanno proprio, fanno un bel casino. Poi finisce che la devi controllare questa tensione lo stesso e rifare tutto. (Ho fatto il girovita per prima, perciò è in queste condizioni mentre gli orli vanno bene!) Comunque, anche se fate lo stesso errore che ho fatto io, è molto importante lasciare uno spazio aperto sul retro del girovita per inserire l'elastico.
...and the massacred waistband. Don't be lazy like me; always check thread tention, especially with stretch fabrics! If you don't, your stitching will skip, won't stitch at all, will be a big mess. Then you'll just end up fixing the tention after all and redoing everything. (I sewed the waistband first, which is why it's in this hideous condition while the hems are fine!) Anyway, even if you make the same mistake that I did, the important thing is to leave an opening in the back of the waistband for the elastic.

Misurate l'elastico intorno alla tua vita e fissatelo con una spilla a balia, poi segnalate dove finisce l'estremità dell'elastico.
Measure the elastic around your waist and attach the ends with a safety pin, then mark off where the end hits the other side.

Togliete la spilla, rimettetela all'estremità e infilatela con elastico attaccato dentro il canale cucito fino a che non esce di nuovo dalla stessa apertura.
Take out the pin, stick it back into the end of the elastic and slip it through the sewn casing until it comes out the same opening again.

Cucite l'elastico sempre in modo che l'estremità finisce dove l'avete segnato. Tagliate via il resto dell'elastico.
Sew the elastic so that the end comes up to where you marked it. Cut off the rest of the elastic.

Tirate la stoffa per far rientrare del tutto l'elastico e cucite l'apertura. Io preferisco piegare un pezzetto di nastro e infilarlo sotto la stoffa per renderlo più evidente dov'è il retro dei leggings, ma non è necessario.
Pull the fabric so that the elastic slips back inside the casing and sew the opening closed. I like to fold a piece of ribbon and slip it in under the fabric to make it easier to see which side is the back, but it's not necessary.

Ed ecco fatto! Le istruzioni sono un po' lunghe, ma non era così male, no?! :)
And there you have 'em! The instructions were a bit on the long side, but it wasn't that bad, now, was it?! :)

Ora stendetevi e rilassatevi, ammirando i vostri nuovi leggings comodissimi!
Now stretch out and relax, admiring your comfy new leggings!

O, in alternativa, potete usare un po' di quelle stoffa avanzata (soprattutto se avete tagliato la stoffa piegandola a metà, ci sarà un bel pezzo da tra le gambe) per creare una fascia per i capelli coordinata!
Or, if you're up for more work, you could take some of that extra fabric (especially if you cut out the pieces by folding the fabric in half, there will be a big piece from between the legs) to sew up a quick coordinating headband!

Ahhh! (Ve l'avevo detto che stavo pensando di fare questo tutorial da un anno; questa foto è di un'anno fa, per questo ho i capelli diversi da come sono nelle foto attuali nel blog!) Prossima puntata: leggings, ma in versione refashioned, cioè senza tessuto al metraggio!
Ahhh! (I told you that I'd been wanting to write this tutorial for the past year; this picture is from a year ago, which is why my hair's different here than in the current pictures of my blog!) Next up: refashioned leggings, without fabric yardage! Stay tuned!