Le API messe a disposizione dal framework OpenCV, tra le tante cose, comprendono un set di routine per il riconoscimento dei visi all’interno di immagini o video. In questo articolo vedremo un semplice esempio di “face-detection” basato sul detector di Viola-Jones [1] e la sua successiva ottimizzazione [3].
Fondamentalmente, questo algoritmo tratta e risolve un problema di machine learning, in altre parole, si tratta di un classificatore che necessita di una fase di addestramento iniziale. OpenCV fornisce configurazioni già pronte per il riconoscimento delle varie parti del viso, di persone e di altre cose, memorizzati in file XML pronti per essere utilizzati. Se la necessità non rientra nelle tipologie già fornite, è possibile provvedere ad addestrare il classificatore utilizzando un set proprio di immagini con l’oggetto da riconoscere. L’addestramento di un classificatore non è un compito banale dato che ci sono molti fattori da tenere ben presente che riguardano un set di immagini come dimensione, luminosità, qualità, colore e molte altre cose. Solitamente, nel caso dei classificatori Haar di openCV l’addestramento vede l’utilizzo di alcune centinaia di immagini.
Data la vastità dell’argomento non possiamo affrontarlo qui, ci limiteremo ad una veloce trattazione sulla teoria delle Haar-like features e vedremo un esempio fatto con OpenCV.
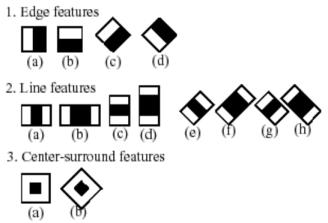
Figura 1: Haar features comuni
Come funziona il filtro Haar?
Il classificatore restituisce in output il valore uno se nella regione dell’immagine analizzata trova una corrispondenza simile all’oggetto ricercato, altrimenti zero. Per cercare l’oggetto all’interno dell’immagine, viene spostata pixel per pixel, una finestra di ricerca in modo da coprire tutte le posizioni. Il classificatore è concepito in modo da essere “ridimensionabile”, in grado quindi di cercare oggetti di diverse dimensioni all’interno dello stesso frame. La procedura di ricerca, oltre ad essere ripetuta pixel per pixel in ogni punto dell’immagine, è anche eseguita in tutte le scale possibili.
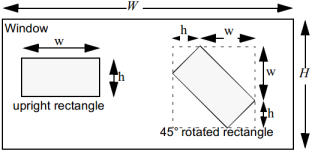
Figura 2: Esempio di finestra
Ogni “feature” Haar consiste in due o tre rettangoli bianchi e neri. Il valore di un “Haar-like features” corrisponde alla differenza tra la somma del valore di grigio del pixel con le regioni nere e bianche del rettangolo:

Il rettangolo può essere calcolato usando una rappresentazione intermedia chiamata “integral image“.
Questa immagine è un array contenente le somme dei valori di intensità dei pixel localizzati a sinistra e direttamente sopra il pixel alla locazione (x, y) inclusa. Se A[x, y] è l’immagine originale e AI[x, y] l’integral image, allora quest’ultima è calcolata secondo l’equazione:


Dopo questa breve ma insufficiente introduzione teorica possiamo passare al lato pratico. Un adeguato approfondimento della teoria è comunque disponibile seguendo i riferimenti nella bibliografia. Di seguito riporto il codice sorgente di un semplice programma che, utiizzando una webcam installata sul pc, rileva il viso, gli occhi, il naso e la bocca del soggetto ripreso utilizzando le funzionalità di OpenCV 2.4
#include <QCoreApplication>

#include "opencv/cv.h"
#include "opencv/highgui.h"

using namespace cv;
using namespace std;

/* Global variables */

const int gflags = CV_HAAR_FIND_BIGGEST_OBJECT | CV_HAAR_DO_ROUGH_SEARCH;

// Parameter specifying how much the image size is reduced at each image scale
const float search_scale_factor = 1.1f;

// A storage for various OpenCV dynamic data structures, such as CvSeq, CvSet etc.
CvMemStorage* storage;

// Face
const char* faceCascadeFilename = "C:\\opencv\\data\\haarcascades\\haarcascade_frontalface_alt.xml";
// Eyes
const char* eyeCascadeFilename = "C:\\opencv\\data\\haarcascades\\haarcascade_mcs_eyepair_big.xml";
// Mouth
const char* mouthCascadeFilename = "C:\\opencv\\data\\haarcascades\\haarcascade_mcs_mouth.xml";
// Nose
const char* noseCascadeFilename = "C:\\opencv\\data\\haarcascades\\haarcascade_mcs_nose.xml";

/* Sub-routines */

// Image pre-processing routine
IplImage* PreProcessing(IplImage* original_image)
{
    IplImage* image;

    // Convert to gray scale
    if(original_image->nChannels == 3)
    {
        // Creates an image header and allocates the image data. Based on original frame.
        image = cvCreateImage(cvGetSize(original_image), IPL_DEPTH_8U, 1);
        // Convert from RGB (actually it is BGR) to Greyscale.
        cvCvtColor(original_image,image,CV_BGR2GRAY);
    }
    else
    {
        image = original_image;
    }

    // Resize
    // ... Resize the image to be a consistent size, even if the aspect ratio changes. Not implemented

    // Equalization
    cvEqualizeHist(image, image);

    return image;
}

// Detection routine
CvRect detect(
        IplImage* image,                        // Image
        CvHaarClassifierCascade* classifier,    // Haar classifier loaded
        CvSize size,                            // Minimum window size to analyze
        int flags = gflags                      // Haar detection flags
        )
{
    // Stores coordinates of a rectangle.
    CvRect rc;
    // Dynamically growing sequence.
    CvSeq *rects;

    /*
    * Detects objects in the image:
    * Parameters of cvHaarDetectObjects()
    * image – Image to detect objects in
    * cascade – Haar classifier cascade in internal representation
    * storage – Memory storage to store the resultant sequence of the object candidate rectangles
    * scale_factor – The factor by which the search window is scaled between the subsequent scans, 1.1 means increasing window by 10%
    * min_neighbors – Minimum number (minus 1) of neighbor rectangles that makes up an object. All the groups of a smaller number of rectangles than min_neighbors-1 are rejected. If min_neighbors is 0, the function does not any grouping at all and returns all the detected candidate rectangles, which may be useful if the user wants to apply a customized grouping procedure
    * flags – Mode of operation. Currently the only flag that may be specified is CV_HAAR_DO_CANNY_PRUNING. If it is set, the function uses Canny edge detector to reject some image regions that contain too few or too much edges and thus can not contain the searched object. The particular threshold values are tuned for face detection and in this case the pruning speeds up the processing
    * min_size – Minimum window size. By default, it is set to the size of samples the classifier has been trained on ($\sim 20\times 20$ for face detection)
    */
    rects = cvHaarDetectObjects(image, classifier, storage, search_scale_factor, 3, flags, size);

    if(rects->total > 0)
    {
        // Returns a pointer to a sequence element according to its index, the first bigger face detected
        rc = *(CvRect*)cvGetSeqElem(rects,0);
    }
    else
    {
        // Face not found
        rc = cvRect(-1,-1,-1,-1);
    }

    cvClearMemStorage(storage);

    return rc;
}

// Program entry point
int main(void)
{
    // "CvCapture is a "black box" capture structure
    CvCapture* capture = 0;

    // Allocates and initializes the CvCapture structure for reading a video stream from the camera.
    capture = cvCaptureFromCAM(-1);

    if(!capture) cout << "No camera detected" << endl;

    // The function cvNamedWindow() creates a window which can be used as a placeholder for images and trackbars.
    // Created windows are referred to by their names.
    cvNamedWindow( "window", CV_WINDOW_AUTOSIZE );

    // Creates the memory storage
    storage = cvCreateMemStorage(0);

    CvHaarClassifierCascade* faceCascade;
    CvHaarClassifierCascade* eyeCascade;
    CvHaarClassifierCascade* mouthCascade;
    CvHaarClassifierCascade* noseCascade;

    if( capture )
    {
        cout << "In capture ..." << endl;

        // Load filters

        faceCascade = (CvHaarClassifierCascade*)cvLoad(faceCascadeFilename);
        if(!faceCascade)
        {
            cout << "Couldnt load face detector: " << faceCascadeFilename;
            return -1;
        }
        eyeCascade = (CvHaarClassifierCascade*)cvLoad(eyeCascadeFilename);
        if(!eyeCascade)
        {
            cout << "Couldnt load eyes detector: " << eyeCascadeFilename;
            return -1;
        }
        mouthCascade = (CvHaarClassifierCascade*)cvLoad(mouthCascadeFilename);
        if(!mouthCascade)
        {
            cout << "Couldnt load mouth detector: " << mouthCascadeFilename;
            return -1;
        }
        noseCascade = (CvHaarClassifierCascade*)cvLoad(noseCascadeFilename);
        if(!noseCascade)
        {
            cout << "Couldnt load mouth detector: " << noseCascadeFilename;
            return -1;
        }

        int i = 0;

        // Creates default rectangles
        CvRect faceRect = cvRect(-1,-1,-1,-1);
        CvRect eyeRect = cvRect(-1,-1,-1,-1);
        CvRect mouthRect = cvRect(-1,-1,-1,-1);
        CvRect noseRect = cvRect(-1,-1,-1,-1);

        // ROI structures are zones of interests
        CvRect ROIeyes, ROImouth, ROInose;

        for(;;) // Application loop
        {
            // The function cvQueryFrame() grabs a frame from a camera or video file,
            // decompresses it and returns it.
            // This function is just a combination of GrabFrame and RetrieveFrame,
            // but in one call.
            // The returned image should not be released or modified by the user.
            // In the event of an error, the return value may be NULL.
            IplImage* iplImg = cvQueryFrame( capture );

            if( !iplImg )
                break;

            // Takes a copy of original image and processed it
            IplImage* iplImgcopy = PreProcessing(iplImg);

            // I avoid all processed frames at the expense of a slight worsening of the real-time to reduce the commitment CPU
            // Run detection every 5 frames
            if(++i == 5)
            {
                // Face detection
                faceRect = detect(iplImgcopy, faceCascade, cvSize(80,80), 0);

                i = 0;

                // Is the face has been detected in the frame
                if(faceRect.width > 0)
                {
                    // Minimum possible object size. Objects smaller than that are ignored.
                    CvSize minSize = cvSize(25,15);

                    // Set the region of Interest: estimate the eyes position
                    ROIeyes =  cvRect(faceRect.x,faceRect.y+(faceRect.height/5.5),faceRect.width,faceRect.height/3.0);
                    cvSetImageROI(iplImgcopy, ROIeyes);

                    // Eyes detection
                    eyeRect = detect(iplImgcopy, eyeCascade, minSize);

                    // Reset region of Interest
                    cvResetImageROI(iplImgcopy);

                    // Set the Region of Interest: estimate the mouth position
                    ROImouth =  cvRect(faceRect.x,faceRect.y+(faceRect.height*2/3),faceRect.width,faceRect.height/3.0);
                    cvSetImageROI(iplImgcopy, ROImouth);

                    // Mouth detection
                    mouthRect = detect(iplImgcopy,mouthCascade,minSize);

                    // Reset region of Interest
                    cvResetImageROI(iplImgcopy);

                    // Set the Region of Interest: estimate the nose position
                    ROInose =  cvRect(faceRect.x,faceRect.y,faceRect.width,faceRect.height);
                    cvSetImageROI(iplImgcopy, ROInose);

                    // Nose detection
                    noseRect = detect(iplImgcopy, noseCascade, minSize);
                }
            }

            // Draws rectangles if and only if face has been detected
            if(faceRect.width > 0)
            {
                // Face
                cvRectangle(
                            iplImg,
                            cvPoint(faceRect.x,faceRect.y),
                            cvPoint(faceRect.x+faceRect.width,faceRect.y+faceRect.height),
                            cvScalar(0,0,200),
                            2
                            );
                // Eyes pair
                cvRectangle(
                            iplImg,
                            cvPoint(ROIeyes.x + eyeRect.x, ROIeyes.y + eyeRect.y),
                            cvPoint(
                                ROIeyes.x + eyeRect.x + eyeRect.width,
                                ROIeyes.y + eyeRect.y + eyeRect.height
                                ),
                            cvScalar(255,0,255),
                            1
                            );
                // Mouth
                cvRectangle(
                            iplImg,
                            cvPoint(ROImouth.x + mouthRect.x, ROImouth.y + mouthRect.y),
                            cvPoint(
                                ROImouth.x + mouthRect.x + mouthRect.width,
                                ROImouth.y + mouthRect.y + mouthRect.height
                                ),
                            cvScalar(255,255,255),
                            1
                            );
                // Nose
                cvRectangle(
                            iplImg,
                            cvPoint(ROInose.x + noseRect.x, ROInose.y + noseRect.y),
                            cvPoint(
                                ROInose.x + noseRect.x + noseRect.width,
                                ROInose.y + noseRect.y + noseRect.height
                                ),
                            cvScalar(0,255,255),
                            1
                            );
            }

            // The function cvShowImage() displays the image in the specified window.
            // If the window was created with the CV_WINDOW_AUTOSIZE flag then the image is shown with its original size,
            // otherwise the image is scaled to fit in the window.
            cvShowImage( "window", iplImg );

            // Wait for a key to terminate the loop
            if( waitKey( 10 ) >= 0 )
                break;

            cvReleaseImage(&iplImgcopy);
        }
    }

    // Releases classifiers
    cvReleaseHaarClassifierCascade(&faceCascade);
    cvReleaseHaarClassifierCascade(&eyeCascade);
    cvReleaseHaarClassifierCascade(&mouthCascade);
    cvReleaseHaarClassifierCascade(&noseCascade);

    // Releases the CvCapture structure allocated by CaptureFromFile or CaptureFromCAM.
    cvReleaseCapture(&capture);

    // Destroys the window with the given name.
    cvDestroyWindow("window");

    return 0;
}
Il programma riconoscerà con una buona accuratezza e precisione le varie parti del viso, la faccia (rosso), gli occhi (viola), il naso (giallo) e la bocca (bianco).
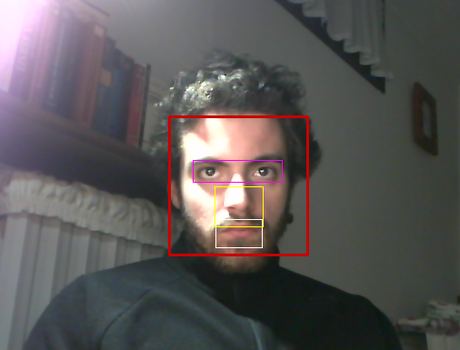
Face-detection in esecuzione
Bibliografia:
.1 Adolf, F. How-to build a cascade of boosted classifiers based on Haar-like features. http://robotik.inflomatik.info/other/opencv/OpenCV_ObjectDetection_HowTo.pdf, June 20 2003
.2 Fabio Marbra, Haar-like features http://www.authorstream.com/Presentation/fabiomarbra-203282-haar-features-newcastle-science-technology-ppt-powerpoint/, Processamento da informacao biologica
.3 Rainer Lienhart, Alexander Kuranov, Vadim Pisarevsky, Empirical Analysis of Detection Cascades of Boosted Classifiers for Rapid Object Detection, Microprocessor Research Lab, Intel Labs
