Mia cugina ha avuto il suo secondo bimbo in agosto. A dire il vero, quando ho preparato questo regalino non si sapeva ancora il sesso, così per realizzare questo album "Il Mio Primo Anno" ho utilizzato tutte carte dai colori pastello che mi sono state fornite da Magenta Style. Molto semplice da realizzare, all'interno solo qualche ritaglio di carta e timbri usati negli angoli delle pagine.
For my English friends: My cousin had her second baby in August. When I have prepared this album I didn't know the sex, so I've made this "My First Year" album using pastel papers received from Magenta Style. Really easy to made, some scraps of papers and stamps inside the pages.
Materiale usato:
6 cartoncini colorati per le pagine
2 cartoncini panna 30,5x20,5 cm per l’interno copertina
2 fogli di carta Magenta 15,25x20,5 cm per la copertina
1 striscia di stoffa 5x21,5 cm
12 rettangoli di carta Magenta 14x10 cm Spring Rhapsody
12 striscie di carta lunghe 14 cm
timbri Magenta Garden Silhouettes e Savvy Symbols
Peel off’s green
etichette per i mesi
stickers e rubons
biadesivo
macchina da cucire
Material I used:
6 color cardstocks for pages
2 cream cardstock 12”x8” as first and last page
2 Magenta patterned 6”x8” for the cover
1 strips of fabric 2”x 8 ½ ”
12Magenta patterned 5” ½ x4” Spring Rhapsody
12 paper strips 5” ½ long
clear stamps Magenta Garden Silhouettes e Savvy Symbols
Peel off’s green
Months labels stickers and rubons
double side adhesive
sewing machine
Tagliate 6 cartoncini colorati e 2 color panna, nella misura 12”x8” e piegateli a metà.
Cut 2 cream and 6 color cardstocks, measure 12 "x8". Fold them.
 Create una cucitura a macchina lungo i lati di tutti i cartoncini e delle due carte Magenta.
Create a sewing machine edge on all pages and on patterned.
 Incollate pagina contro pagina lasciando i due cartoncini panna alle estremità dell’album appena creato. Realizzate il fronte album con le carte Magenta. Io ho utilizzato del biadesivo.
Glue page to page, leaving the two cream cardstocks as first and last page of the album just created. Create the cover using 2 pieces of patterned 6”x8”. I used the double sided adhesive .
 Create la vostra etichetta da un cartone. Ritagliate e dipingetela.
Create a unique label from a cardstock. Cut out and paint it.
 Applicare il bordino verde peel off’s.
Apply the green peel off's all around.
 Fate aderire bene aiutandovi con una pieghetta.
Help yourself with a bone folder.
 Applicate le etichette dei mesi.
Apply the labels of the months to all pages.
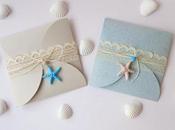
 Rilegate l’album con il bordo di stoffa. Decorate la copertina con la targhetta e i rubons.
Bound your album with a strip of fabric. Decorate the cover with the handmade plate and rubons.
 Decorate l’interno del vostro album con i rettangoli di carta Magenta, decorate gli angoli delle pagine con i timbri.
Decorate the inside of your album with scraps of Magenta paper, decorate the corners of all pages with stamps.
 Queste alcune pagine:
Here some pages:


La prima pagina con qualche semplice strisciolina di carta.
First page with some simple little paper strips.
 Facile no?
Really easy, don't you?