Adoro i mondi in miniatura da portare con sé, in particolar modo le casette (non ve lo sareste mai immaginato, vero?). Così, per ospitare la nostra piccola famiglia di imbambolati realizzata da Faccio e Disfo, ho pensato di mettermi al lavoro e realizzare per la mia bambina una borsa casetta da mettere sotto l’albero.
I love miniature worlds that you can take with you, especially little houses (yep, I know I surprised you…). That’s why, to accommodate our little family made by my friend Rita of Faccio e Disfo, I decided to create a house bag to put under the tree for my little girl.
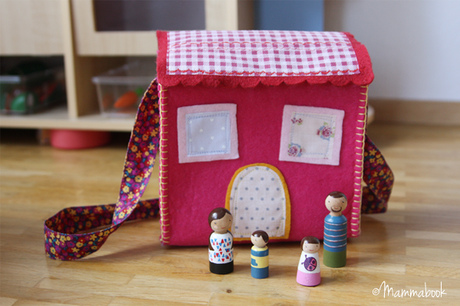
La realizzazione, che in realtà rimando da tantissimo tempo, si è rivelata meno complicata del previsto, e per questo ho deciso di riassumerla per voi in un tutorial. Ho poche foto sfuocate della lavorazione, dato che per non farsi scoprire mamma-elfo ha dovuto lavorare soprattutto la sera. Poco male, visto che alla fine ho deciso di rimpiazzare le foto con i disegni, e il procedimento in questo modo mi sembra molto più chiaro...
Making it was less complicated than expected (to be honest, I’ve been thinking about it for at least a year!), so I decided to share the project with you and make a little tutorial out of it. The photos I took while sewing are dark and out of focus, because mommy-elf had to work in the night to not be discovered. So I replaced the pictures with some drawings; at the end of the day it wasn’t too bad, since the drawings seems to be a lot clearer…
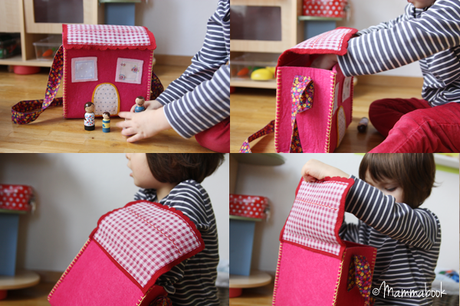
Per realizzare la borsetta avrete bisogno di un foglio di feltro spesso mezzo centimetro, uno rosso più sottile per il tetto, e altri nei colori che preferite, anche di quelli molto sottili che si vendono solitamente per i lavoretti. Vi consiglio poi di procurarvi della carta termoadesiva, come quella che ho utilizzato per la borsetta con il coccodrillo (non è necessaria, ma rende il lavoro più stabile e semplice), stoffa di vari colori (degli avanzi andranno benissimo), due bottoni e qualcosa per realizzare la tracolla. Potete usare una cintola che non vi piace (come ho fatto io) o non usate più, avanzi di una vecchia borsa, o addirittura della cinghia da avvolgibili, come in questo vecchio progetto che ho realizzato tempo fa con mia suocera.
To make a little house bag you’ll need a thick sheet of felt (more or less 0,2 inches high), some thinner red one for the roof, and some even thinner for all the rest, like the one usually sold in the DIY kits. I recommend you to use some iron-on adhesive, like the one I used for the crocodile bag for boys (it is not necessary, but it makes your work easier and more resistant). You’ll need also nice fabric scraps, two buttons, and something to use as a shoulder strap. You can use a belt you don’t like (like I did) or that you don’t use anymore, pieces of an old bag, or even the straps of the window shutters (you can buy them at the bricolage) like we did in this old project I made together with my mother in law some time ago.
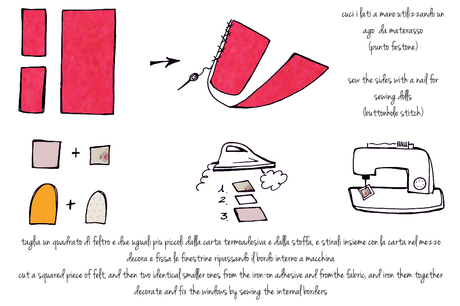
(clicca sull'immagine per vederla in grande)
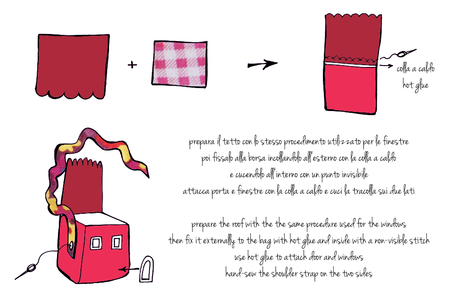
(click on the image to see it bigger)
…e questo è tutto. La parte più laboriosa è sicuramente quella iniziale in cui si devono cucire i lati a mano, che potete semplificare in parte se scegliete di tagliare la base ‘in croce’; io ho preferito fare così per utilizzare al meglio il mio foglio di feltro e ottenere una borsa più grande. Per le dimensioni ho calcolato di perdere con la cucitura circa quattro millimetri a destra e sinistra, e circa due alla base.
This is all. The most difficult part is sewing together the parts right at the begging. You may also consider making your life easier by cutting the felt in a ‘cross’ shape so that you have to sew two sides less. I chose to sew all sides to make the most out of my felt sheet and get a bigger bag, but it’s your choice. For the sizes, I considered loosing 0,2 inches by sewing on the right and on the left, and 0,1 at the bottom.
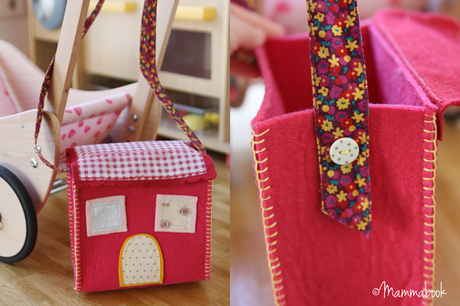
Se il regalo ha avuto successo? Moltissimo, tanto che mi verrebbe voglia di replicare in altri colori, ma ho un sacco di progetti che bollono in pentola…
Was my gift successful? Oh yes, so much that I’d love to make more bags in different colors… but I have a lot of project and plans for the next months. So keep in touch, there’s a lot more to see in the next weeks!


